We recently set up a private AI platform for a small organisation. The staff wanted a ChatGPT-style assistant to help with their daily work, but the documents they deal with (contracts, client records, internal policies) could not be sent to a third-party AI service. So we built one that runs on infrastructure we control.
This is the first post in a four-part series, and I will cover each part of the setup:
- Part 1 (this post) - The platform: sizing the hardware, running models locally on a Mac, and putting the same stack on a VPS for the team with HTTPS.
- Part 2 - A knowledge base: letting the model answer from company documents using Docling.
- Part 3 - Locking it down: the security steps that keep the server out of the exposed-Ollama statistics.
- Part 4 - Automation: connecting n8n to the local model for real workflows.
If you are new to running models locally, my earlier post Run LLMs locally with Ollama covers the basics. This series picks up from there and focuses on making it work for a team.
What we are building
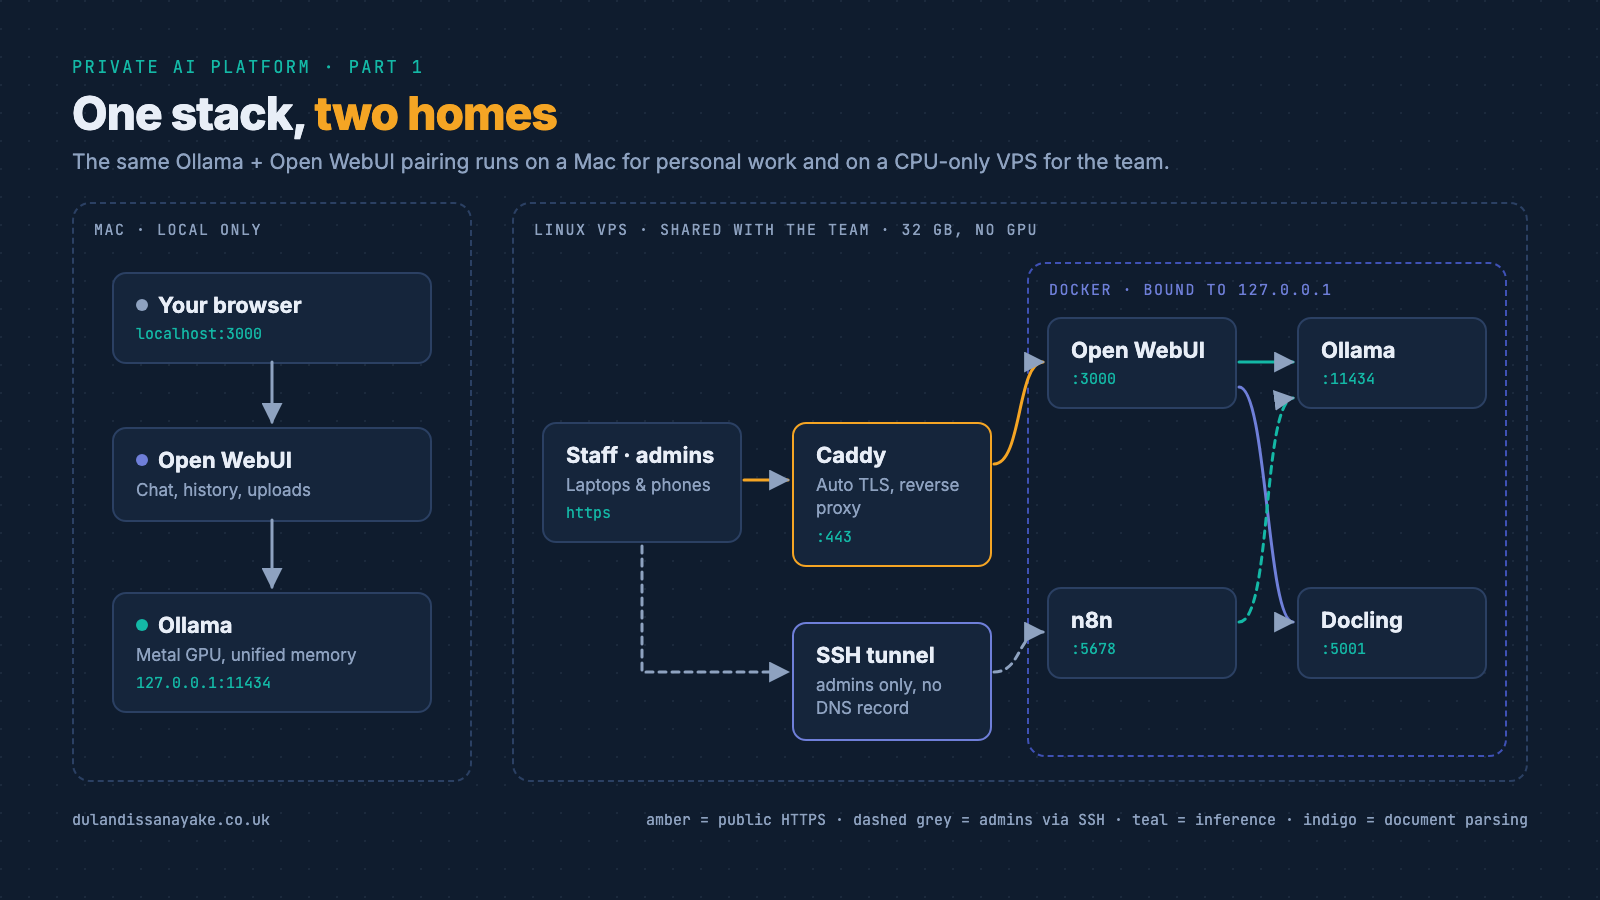
The stack has the same core on two kinds of machine:
- Ollama runs the language models and exposes a REST API on port
11434.- Open WebUI is the chat interface. It handles users, chat history, file uploads and (in Part 2) the knowledge base.
- Caddy sits in front of Open WebUI on the server and takes care of HTTPS certificates automatically.
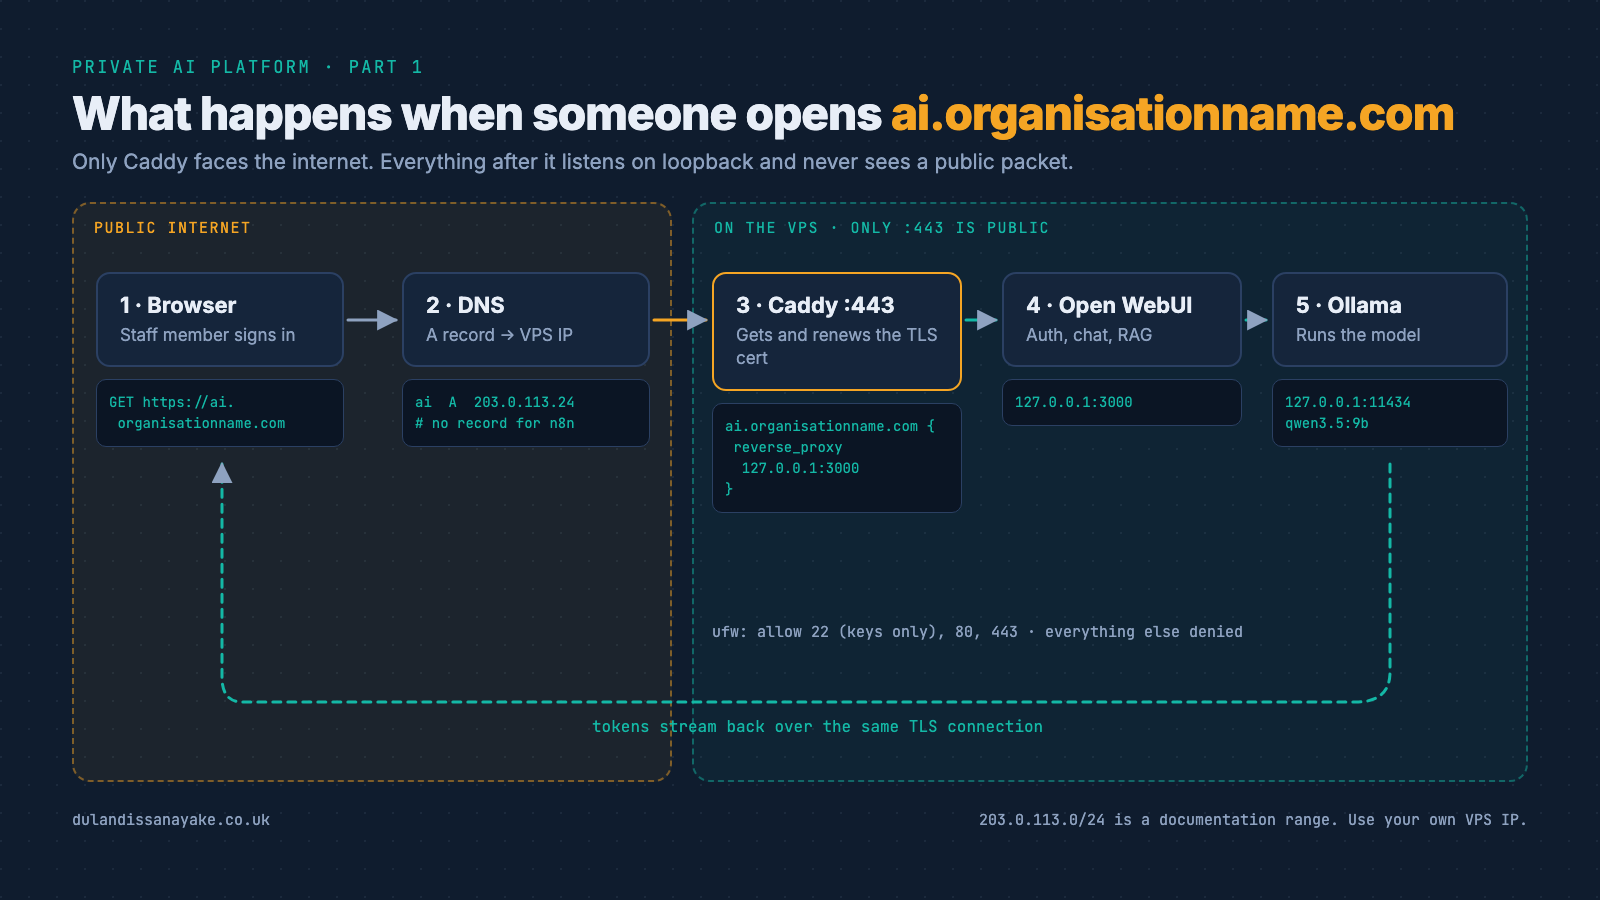
On a Mac this is a personal setup, where everything runs on localhost and nothing leaves the machine. On a Linux VPS it becomes a shared service for the team at https://ai.organisationname.com. In both cases every service listens on 127.0.0.1 only, and on the VPS the only thing facing the internet is Caddy on port 443.
Step 1: Size the machine before you pick the model
The most common mistake with local LLMs is choosing a model first and then finding it doesn’t fit. A model has to sit entirely in memory, alongside the operating system and everything else running on the box.
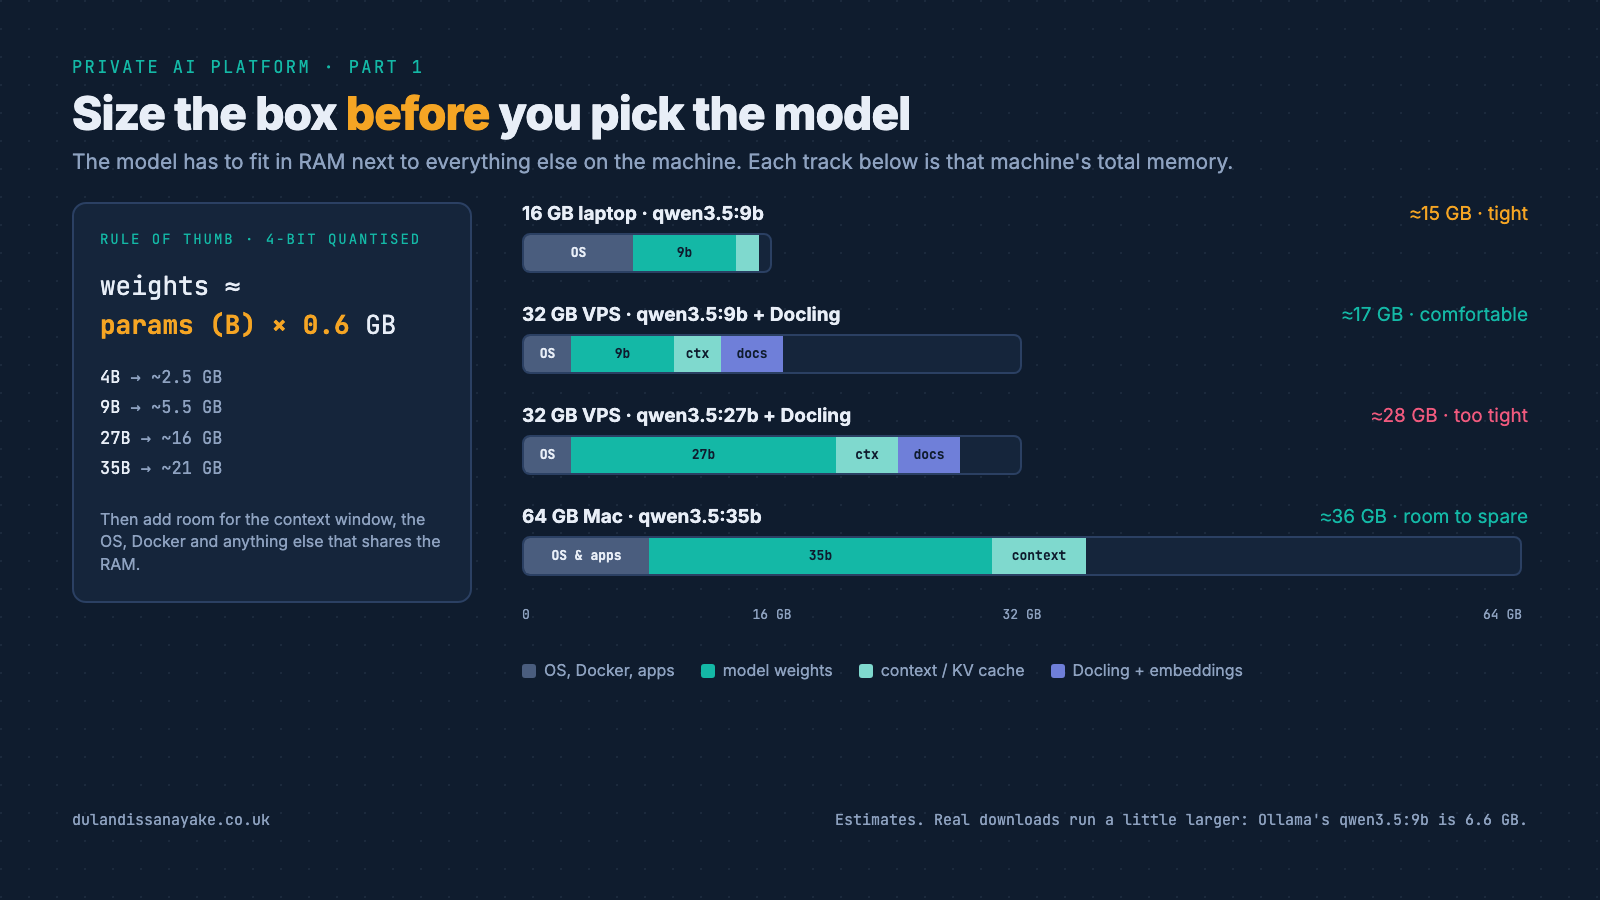
The rule of thumb we used for 4-bit quantised models is roughly 0.6 GB of memory for each billion parameters. Four bits is half a byte per weight, and the quantisation scales and a few higher-precision layers push it a little higher. Real downloads from the Ollama library (checked in November 2026) line up with this:
| Model | Parameters | Ollama download | Fits comfortably in |
|---|---|---|---|
qwen3.5:4b | 4B | ~3.3 GB | 8-16 GB |
qwen3.5:9b | 9B | ~6.6 GB | 16 GB (tight), 32 GB |
qwen3.5:27b | 27B | ~17 GB | 32 GB (tight), 64 GB |
qwen3.5:35b | 35B | ~22 GB | 64 GB |
On top of the weights you need room for the context window (the KV cache grows with the number of tokens the model is holding), the OS, Docker, and anything else on the server. For the team server we also had to leave space for Docling and an embedding model, which arrive in Part 2.
We settled on qwen3.5:9b for the team. It leaves plenty of headroom on a 32 GB server, it supports a 256K-token context window, and it is good enough for drafting, summarising and answering questions over documents.
Note : Ollama’s default context window is 4,096 tokens. That is small once you start pasting in documents, so we raise it with OLLAMA_CONTEXT_LENGTH (see the compose file below). A larger context uses more RAM, so increase it in steps and watch memory.
Step 2 (Path A): Run it on a Mac
A Mac with Apple Silicon is a good place to start. Ollama uses the GPU through Metal, and the unified memory means a 16 GB MacBook can run a 9B model for one person.
Install Ollama and pull a model
You can download the app from ollama.com/download, or use Homebrew:
| |
Check the API
Ollama listens on 127.0.0.1:11434 by default. Qwen 3.5 is a “thinking” model, so it reasons before answering. For quick replies we switch that off with "think": false:
| |
Add Open WebUI
Open WebUI runs in Docker. Ollama itself stays outside Docker on the Mac. Ollama’s FAQ is explicit that GPU acceleration is not available inside Docker Desktop on macOS, so a containerised Ollama would run on the CPU only.
| |
Open http://localhost:3000 and create your account. Keep the 127.0.0.1: prefix in the port mapping. Without it Docker publishes the port on every network interface, which includes the office Wi-Fi.
That is enough for a single user. The rest of this post sets up the shared version for the team.
Step 3 (Path B): A VPS for the team
Why a CPU-only VPS
A GPU server would be faster, but for a small team it is hard to justify the cost, since GPU servers are usually billed by the hour whether anyone is using them or not. A 9B model on a modern multi-core CPU is slower than on a GPU, but it is usable for chat, drafting and document Q&A, and the monthly cost stays fixed.
Speed depends a lot on the CPU you get, so it is better to measure it on your own server once everything is running:
| |
--verbose prints timings after the answer. The eval rate line is your generation speed in tokens per second.
Choosing a provider
We needed 32 GB of RAM, a UK data centre and a predictable bill. These were the 32 GB options when we compared them (prices from each provider’s own page, November 2026):
| Provider | Plan | vCPU / RAM / Disk | Price | UK region |
|---|---|---|---|---|
| Hostinger | KVM 8 | 8 / 32 GB / 400 GB NVMe | $25.99/mo promotional, 24 months paid upfront, renews at $49.99/mo | Yes |
| Hetzner | CX53 | 16 / 32 GB / 320 GB NVMe | from €29.99/mo excl. VAT (listed as unavailable when we checked) | No (DE, FI, US, SG) |
| DigitalOcean | Memory-Optimized | 4 / 32 GiB / 100 GiB | $168/mo | Yes (London) |
| OVHcloud | VPS-4 | 8 / 24 GB / 200 GB | £17.34/mo excl. VAT | Largest plan is 24 GB |
We went with Hostinger KVM 8 in its UK data centre. If you compare prices yourself, check the term behind any promotional price. The monthly figure usually assumes a long upfront commitment, and the renewal price is what you pay after that. In Part 3 I will also go through what the provider’s terms say about regulated data (PCI and HIPAA).
Note : In this post I use 203.0.113.24 as the server IP. It is a documentation-only address range, so replace it with your own.
SSH keys from day one
Create a key pair on your laptop before you create the server, and paste the public key into the provider’s control panel during setup. That way the server never accepts a password login, even on the first boot.
| |
We used Ubuntu 24.04 LTS. After the first login as root, create a normal user with sudo and copy the key across:
| |
Then turn on the host firewall, allowing only SSH and web traffic. Caddy needs both 80 and 443 to obtain and renew certificates.
| |
This is only the minimum before installing anything else. Part 3 covers the rest of the hardening (key-only SSH, fail2ban, the provider firewall and backups).
Install Docker
Install Docker Engine from Docker’s official apt repository by following the Ubuntu install guide. Docker’s own docs say the get.docker.com convenience script isn’t recommended for production, so we avoided it. Check the Compose plugin is there:
| |
The compose file
Everything lives in one folder on the server:
| |
~/ai-stack/docker-compose.yml:
| |
Some notes on this file:
- Port bindings - Every port is bound to
127.0.0.1. Docker writes its own firewall rules and published ports bypass ufw, so binding to loopback is what keeps these ports reachable only from the server itself.- Ollama connection - Open WebUI talks to Ollama over the Compose network (
http://ollama:11434) and doesn’t need the published port. We keep127.0.0.1:11434only to test withcurlfrom the host.- WEBUI_SECRET_KEY - This signs the login tokens. If you don’t set it, the Docker image generates one inside the container, and recreating the container logs everyone out.
- Image tags -
:latestand:mainare fine to get started. In Part 3 we pin exact versions and add an update routine.
Start the stack and pull the model:
| |
Check that nothing is listening on a public interface:
| |
And test the model from the server:
| |
Step 4: DNS and HTTPS with Caddy
DNS
At your DNS provider, add a single A record for ai pointing to the server’s IP. Then check it resolves before going further:
| |
Note : If your domain also has an AAAA (IPv6) record for ai, make sure it points to this server too. Let’s Encrypt prefers IPv6 when both exist, so a stale AAAA record is a common reason certificate issuance fails.
There is no DNS record for n8n, which we add in Part 4. It is only used by admins and doesn’t need to be on the public internet at all.
Install Caddy
We run Caddy directly on the host rather than in Docker, which keeps the loopback-only port bindings simple. These are the commands from Caddy’s install docs:
| |
Configure the site
Replace the contents of /etc/caddy/Caddyfile with:
| |
Caddy handles the rest by default. It gets a certificate from Let’s Encrypt (with ZeroSSL as a fallback), renews it automatically, redirects HTTP to HTTPS and proxies the WebSocket connections Open WebUI uses for streaming responses.
| |
Step 5: First login
Open https://ai.organisationname.com as soon as Caddy is up. In Open WebUI the first account created becomes the admin, so until you create it, anyone who finds the URL could take that role.
After logging in as admin:
- New users - Set the default role to “pending” so nobody gets access until you approve them, or turn off sign-ups and invite people instead. Part 3 explains why the admin panel setting matters more than the environment variable here.
- Default model - Set
qwen3.5:9bas the default model.- Thinking - In the model’s advanced parameters, turn off the Ollama
thinkoption for everyday use. Answers come back much faster, and you can turn it back on for harder questions.
Now the team has a private assistant on its own domain with HTTPS, and the model, chats and uploads all stay on a server you control.
Common issues
These are the usual problems when setting up this stack for the first time:
- Port published without 127.0.0.1 -
ufw statuslooks fine while the port is open to the internet, because Docker bypasses ufw. Check withss -tlnp. In Part 3 we also scan the server from outside.- Certificate is not issued - Usually DNS hasn’t propagated yet, port 80 is closed, or an old AAAA record points somewhere else.
journalctl -u caddyshows which one it is.- Model is very slow or doesn’t load - It is probably too large for the RAM left after everything else is running. Use a smaller model (
qwen3.5:4b) or reduce the context length.- Long documents get cut off - The default 4,096-token context truncates long prompts. Raise
OLLAMA_CONTEXT_LENGTHand keep an eye on memory.- Everyone is logged out after an update -
WEBUI_SECRET_KEYwasn’t set, so a new key was generated when the container was recreated.
What’s next
The platform is running, but the model only knows what it was trained on. In Part 2 I will add a knowledge base so staff can ask questions about the organisation’s own documents, with Docling reading the PDFs, tables and scanned pages before they are embedded.
Sources : Ollama FAQ, Ollama thinking docs, Ollama model library, Open WebUI env configuration, Caddy automatic HTTPS, Docker packet filtering and firewalls.